Search This Blog

Wednesday, November 28, 2012

Let's chat about corners

Let's chat or curse, whichever, about corners.  (I personally, will curse.)
I hate'em.
They are the bane of my quilting existence.

I can do many things in quilting, and I feel confident about my projects, except for the corners.  I am still after nearly 20 years of working with fabric, trying to get a good decent corner consistently.


I have read all the tips, I try all the different ways, I listen to suggestions.
My corners look like hell, in my opinion.

My last three or four projects, I started to feel good about the corners.  Breathing a little easier when the turn came up.


I think they were starting to flow with the binding application and they looked pretty decent.


They even had the little miter fold.  I was not feeling anxious at all about placing the corners or even showing off the edges.


I have picked, re-worked, gone slow and cautious, a lot of times to no avail.  I don't say anything to a quilt receiver, they probably wouldn't notice, but I do.  And I look at other quilters corners, and I think 'why in the hell can't I get this down?'

So, it was going better, and for the Modern She Made Swap I wanted to make my partner place mats.
Four place mats with four corners each.  That is 16 corners!
Guess what?  I'm a bookkeeper, and I didn't do the math.  Until I was already down the rabbit hole making four place mats, and it was way too late to start anything else that only had four corners or maybe was round and didn't have corners at all!
It did not go well with the corners. 
And giving this to another quilter made me want to cry.  The corners just fought me.


I made little tiny 1" finished squares.  I free motion quilted the borders.  The colors look darling.  I don't think I ruined it with the corners, but they could look better.
 I would say 4 of the corners turned out well, 4 were passable and the other 8 look like amateur hour.


I could not bare to even take a photo of the corners close up.


I also made her a scarf, a scarf that does not require binding.
Which made me feel better.  I added fringe to the end of the scarf for fun, I was feeling so good about not making corners.


And then when I was addressing the package, I saw my partner lives in FL.  Perhaps something that might have made me think twice about making her a scarf.
Hmmm.  Well, it's a thin scarf, hopefully she will like it to add color to an outfit.

This is a good swap, I have been in it before, I received a great bag I'll show in another post.  So, it isn't the swap it is the swapper having a bad sewing week.

And so, if you have advice you would like to offer on corners, throw it at me.  I will read it all, I will try it all, and I will drink after to take away the sting.


Saturday, November 24, 2012

Yep, it's Quilted. - Mostly -

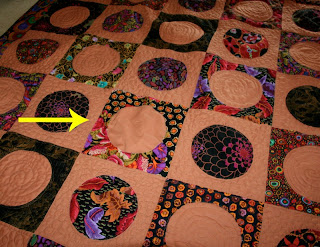
Don't you love it when you are done, done, done? Quilting done after days and nights, binding on, ready to photo, wash and send off to the lovely recipient?

All except that one little spot that you see after you have put away the thread the foot and the quilting needle, after you've done your happy dance.  Yep.  Missed a spot. Or a circle.  Deflation.


Think anyone will notice?  Besides me, whom it will bother to eternity.


This quilt is based off a pattern by Julie of Jaybird Quilts.  
It was windy so I had my son hold up the quilt for me, at 6' 3" he had to stretch.  Which makes it perfect for the intended super large man.


The back, some Kaffe Fassett prints and Kona cottons, I think the mustard solid is from Northcott.


I like how the quilting shows up on the back.  I quilted the straight lines with a walking foot, I went up and down the edges of each row and across too. I used FMQ for the bubbles and spirals inside each circle.  I only quilted on the Kona Solid of each square.    


I am holding on to this until Christmas, and someone will be very quilt happy.  
Besides me, having this one done.


The front is Kaffe Fassett prints and Kona Nutmeg, I no longer see Nutmeg on my Kona chart, so they must have discontinued that one when the new colors came out in June 2012.  The color is somewhere between Sienna and Amber.  Really, I didn't know that some colors were taken out.  I used Aurifil 40 wt brown in the bobbin and a 40 wt Amber color for the top (it is #2340, they don't show names on the Aurilfil card).  
I will quilt that one spot before washing, kind of a pain, but I can't leave it hanging out there by itself.  

Stay Calm and Quilt On.
Loads of time to join the Postage Stamp Block Swap on Flickr
shipping in January 2013!  


Wednesday, November 21, 2012

WIP Wednesday Quilting

Happy Thanksgiving Everyone!
We are headed to my Grandmother's home for our family meal, and this is what my husband had to say about that:

Him:  Where are we eating this year?
Me:  At Grandma's house.
Him:  Oh, good, because then we just show up.
Me:  Uhhhh
Him:  And sleep in.
Me:  Well, maybe SOME of us do!
Him:  Well, you still have to make food and cart it over there and make the pies, but I get to sleep in.
Me:  I'll let you know which special pie is yours.  


And now, because I have been sewing this week, I am linking up with Freshly Pieced  for a mid week"what'cha workin on?" post.

WIP Wednesday at Freshly Pieced


I've been quilting on this every night this week


I pieced the back one night, which I don't have a photo of yet


Quilting this mammoth, I'll have to measure when it's complete later today


Bubble quilting in the blank areas, not sure what what I will do inside the circles, maybe more circles


More to go!  But optimistic this will be done today.

Sunday, November 18, 2012

Sew Sunday

This year a new guild started in my area Virginia Beach Modern Quilt Guild.  I am so happy to not have to travel two hours to get a Modern Quilt Guild fix.  
We had a gift exchange this month and set up a group charity quilt for next year.  We are still a small group, but we are going to grow, learn from each other and ohhh and ahhh over our quilts.  

This is what I made my secret partner


It's a table runner in blues and white with a pop of red for the binding.  The back is a linen that has the pop of red also.  I used white King Tut quilting thread on the top and a blue variegated for the bobbin quilting thread.


And this is what I received - someone must know me!  
A tote!  
Browns oranges and yellows!
Variegated thread!  


I have gotten busy on my bee block pile, so I can get back to some other sewing on my agenda for the weekend.

These were from October (sorry!)  Design Camp 2, Jacqueline asked for blocks that reminded us of her home state of Wisconsin.  My first idea came from thinking of a prairie, which led me to Little House on the Prairie, which led me to think of a log cabin.  So my first block is a log cabin style using fabrics Jacqueline provided.


My second block is improv scene of the planted fields with a red barn and the big sky.  I added fabrics for this block, but I think Jacqueline will like it.


I also completed November blocks for Design Camp 2, Jody asked for rectangles and squares, angular pieced blocks with fabric she provided.


And lastly, the next block in the Quilt Around the World II group.  I have now completed 10 blocks for 10 different members in this group.  15 more to go.  The theme for Julianne's quilt is Paris in black and white with a touch of aqua.

For my block I was thinking about the fashion influence Paris has on the world.


All of Julianne's blocks together


Stay Calm, my friends, and Sew On.  


Wednesday, November 14, 2012

Bird on a Branch Quilted

I went to a quilter friends' house over the weekend.  This is on the one hand fun and motivating for sewing, and on the other dangerous.  Dangerous as I get to see and use all the fun things she has sitting around in her sewing room that I have yet to try out before purchasing myself.  

Amazon was not disappointed on Monday.

I took a top with me to quilt on her Handiquilter Sweet 16.  I have two friends who have this machine and it is high up on my list of 'needs' (my husband thinks this list is the 'roll-your-eyes list', because that is what he does).

I have many tops sitting around waiting their turn to be quilted.  I don't know, I find the fun part to be the fabric choices, the design choices, and the piecing.  Quilting has not been my most favorite part of quilting, but it's hard to be a 'quilter' if you don't actually quilt.

I brought this top with me - it's been completed for over a year.  I've had the back purchased for almost as long.


A combination  of my favorite lines - Joel Dewberry Aviary and Kaffe Fassett, and some of my favorite colors.  I know when I made this top I had inspirations from a magazine photo and a Kaffe Fassett quilt in one of his books, but I didn't keep any of that with the top.  Just know, I try to give credit when I can.  

And, How was quilting on that awesome machine, you ask?  Well, one, I quilted this in one night, granted that night ended at 3 a.m., but still it was done.  Two, wow, it was wonderful to not have to stuff my quilt under a too small space while quilting.  I can really appreciate that machine.  However, it was my first time using the quilting machine, and let's just say I would rather you look at my quilting this far away.


Versus this far away.


I backed with a flannel - the first time doing that for a quilt size project, I have done that on smaller baby throws.  I thought the flannel looked like tree bark and went with the fabrics on the front.


I folded the flannel back over the edges for the binding.  That may be the first time I've done that, I can't remember doing it before, but I may have.  It worked well for the flannel.  


Now everyone in the house is all 'Hey, I want a flannel backed quilt!' Because I had to brag on how warm and comfy it was.  


Bird on a Branch

Still time to join the Postage Stamp Block Swap on Flickr!
Shipping of blocks not till January!


Tuesday, November 13, 2012

Granny Squares Baby Quilt

Very excited to get the binding on this quilt!  And the baby this is for is only two months old, sometimes they are graduating high school before I get their quilt to them.  Or having babies of their own.


I am a quilter who machine binds the quilts.  A long time ago in a quilt universe far far away I used to do this by hand.  While this was enjoyable to do in front of the TV, and allowed some bonding time with the quilt, it was heck on my wrists and hands - so now I do it this way.  Using my walking foot I attach the binding to the back and wrap it around to the front, top stitching the edge down.  I used a straight stitch for this quilt.

Those red binder clips are awesome Wonder Clips they are available on Amazon at the link, I also saw them on JoAnn's website.  I like how small they are.  The red color helps to locate them when you pop them off the edge and they go flying.  Good thing there is 50 in the pack.


I used a variegated thread on the top.


And a solid blue thread in the bobbin.  If any bobbin thread appeared in the top thread, it blended.  An important tip.  


Quilt is now washed and dried, all crinkled up soft and squishy for baby.  My favorite part is that part when you take them out of the dryer warm and fresh smelling. 


P.S. There is another row folded over the top of railing.


Sunday, November 11, 2012

Strip Quilting Row 2


My friend Shanna of Fiber of All Sorts started a strip club, naturally she thought of me immediately.  We are Strip Quilters officially, but really it just refers to a strip of fabric or a row of blocks.  We aren't quite as exciting as Magic Mike or anything (really, who is?).  
Below is the first strip of blocks from another stripper in the group Leona of Leona's Quilting Adventure.  
I see in these blocks - comfort, warm colors and subtle changes.
I am making the next row of blocks for Leona that she will add to her Stripper Row.


My block #1
Leona requested warm browns.


With her row of blocks.


My block #2, Leona requested Marcia Derse fabrics.


My block with Leona's row of blocks.


My block #3, Leona asked for Kaffe Fassett fabrics - happy to oblige!


My block with Leona's row of blocks.


My blocks #4 and #5, solid Konas and a star block to match the one in the starter stripper row.


Our two rows together, my blocks are not actually sewn together in this photo - the fabulous Shelley was told to  graciously agreed to sew them into a row for me, she is the next stripper in line for these blocks.  I was working on them at Shelley's and talked too much ran out of time to put them in a row.

Shelley will add a row of her own next!


(I know the photos are a little dark - the colors are very warm and inviting in real life.)

Stay Calm - and Strip On!