Search This Blog

Saturday, August 24, 2013

The Cleaning Fairy

Sometimes I walk into my sewing room - or at least try to walk into my sewing room- and realize that I have spent a lot of time creating and not a lot of time putting anything away.  Or really anytime.  Sometimes I can't even see the floor.  Sometimes I don't want to walk through the door because no more creativity can happen in all this jumble.  


 I spent a whole day folding fabric and rearranging the fabric closet.  On the bottom are containers and packages with projects started or going to start or tops not quilted and some flannel and pillow forms.  This is organized people. 


This is not.  There is a surface, somewhere, under there.  I will find it.


I moved my ironing board.  I liked where the ironing board was, but it crowded the entry into the room.  I put it closer to my sewing table, and I pushed the sewing table out more into the room so I could walk in between.  Really an ironing board is such a cumbersome thing and there is not a good place for it to sit, so I just try to fit it in.  I think this will work better for me than where it was by the entry.  


Progress.  I can see some of the floor.  


My linens and Japanese fabrics, sorted and folded.  


My Oakshott collection - decided to put these in the fabric closet out of the dust.  The basket was just sitting out in the room, because I like looking at the pretty fabric.


And now, I see floor and surfaces.  And an empty design wall.  


My tv and fabric closet opposite my machine.  The cabinet holds the linens, japanese fabrics, some hand dyes, assorted supplies and things I have forgotten about.  I'm afraid to go through the drawers.


The view when you walk in the room.  The antique cabinet has a basket with all my rulers and my satellite radio on top, inside the cabinet are all the bee blocks I have that I haven't put together yet.  


And this is what is yet to be put away, I ran out of Comic Book Boards for folding fabric.  Also, I'm not sure I can wedge anymore fabric into that closet.  I have determined I don't 'need' anymore fabric, for at least a month.  Maybe two.  Or until I can convert another closet.


I only clean it to mess it up again - that is what creativity is for.  


Keep Calm and Quilt On
Mary

Saturday, August 17, 2013

Oilcloth Tote

I had a small marathon sewing session Friday - it felt good.  Finished up some blocks I wanted to make in ongoing projects and also some swap items for the MQG.  Unbelievably early for me on those swap items.  

I participated in a small swap between a few guilds in the DC/ VA/ MD areas.  It was nice to have our Modern Guild invited to join - I am in the Virginia Beach Modern Quilt Guild, we are just over a year old and going strong.

This swap item was a   Lined Drawstring Bag using the tutorial provided by Jeni of In Color Order.  I like that everyone gets the same thing in this swap, simple and fun.  


I modified the pattern to use a polaroid block in the center of the front - the post it is covering my partners name.  For fun I stitched a small key to the end of the ribbon tie.  I just have to fill it with a few items and off it goes - early.

I'm also participating in a swap with my local Modern Guild.  For our August meeting we are swapping totes.  You know me, I love totes - couldn't pass up that swap.  I think I own 20 or so totes, when I get to one for every day of the year, I'll have enough.  Maybe.  

There are 3782 patterns on line for totes, I counted.  Some are free and some aren't.  I'm not a tote snob, I like all of them.  But my favorite tote is the very first tote I made and I made it for myself.  It is an oilcloth grocery tote.  


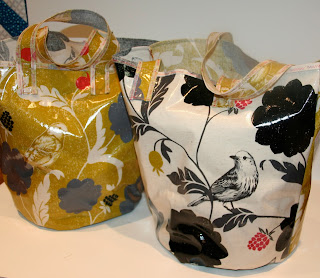
One of these totes in the photo is mine, which I made in 2009 and the other I made for my sister in 2011.  I still use mine every grocery trip. The pattern is from Purl Soho tote pattern on their blog.  I went to the store on a trip to NYC and they had the bag on display, so I promptly bought oilcloth and fell in love.  I bought how much they said for the pattern and ended up with enough for two totes and more left over.  


I love the linen backing of Echino oilcloth, you don't have to line anything made with this.  It is expensive, so I'm picky about projects using it up.  For my partner in this swap I thought this grocery tote would make a good fit, even though I am sure she would love any type of tote.  


Using Wonderclips instead of pins this time around was such a huge help in the process.  

Both sides


Done early - the new me (at least for this week)
My old bag with the new one.  


I went ahead and made myself a new grocery tote at the same time. Yep.  I think they are pretty equal, but will make sure my partner gets the one with even stitches.  


Keep Calm and Quilt On

Mary

Monday, August 12, 2013

Miss Me Much?

I feel like I haven't posted on my blog for ages and ages.  I have had a few sewing nights the last couple of weeks, but haven't had the time or the daylight for photos.  

I have a few trips coming up & one just passed, and I want to make a few handmade travel bags and a duffle for myself.  Yep, taking the time out of my no-time schedule to sew for myself.  First up was a travel duffle - I used Carry On Duffle pattern on Craftsy by StudioCherie.  I liked this one because the pattern included a sleeve for your suitcase handle to slip through.  

First step, order fabrics that now make your handmade travel duffle more expensive than any duffle you have ever purchased.


Second, over several nights assemble bag following directions in pattern.  This could have only taken one long afternoon or evening and night, but it took me three.  One reason, was that I made the bottom of my bag using a different fabric than the sides, I thought the owl fabric was too light and I didn't want it start to look dirty.  So there was figuring and math.  So, third, stop following directions immediately.


I quilted cross hatch diagonal on the body, and horizontal / vertical on the darker fabric.  The dark fabric comes up the side about 3 inches.  You quilt this bag like QAYG - so I zigzagged around the edges of everything.  The edges show on the inside of the bag, but the zigzag finishes the edges ( you could serge if you are so lucky to own a serger - I just fake serge).


Attaching the sleeve panel, I used duck for reinforcement of the sleeve.  I used Kona Mushroom for the interior.


Before the ends were attached


Finished about 8 hours before I have to leave on my first trip to a wedding in sunny, hot, humid FL.  Luckily, there is a beach involved.  And a Travel Duffle.


It's a bit larger than I anticipated and I really had it loaded up.  Don't think I want it quite that heavy on my next trip.  


I'm going to add a piece on to the strap that velcros both straps together for sitting on your shoulder.  I found one of the straps wanted to keep falling off.  I only added one pocket to an end, the pattern called for two, but I didn't think I would use the outside pockets much. Besides, I was in a time crunch getting the ends finished and already not following directions.  I would like a pocket on the inside though, and I'll add that to any others I make.  My grandmother has requested a copy of mine and I'm going to make hers not as wide as mine and add the handle for her.  


Think his parents would notice if he went on my next trip with me?


Keep Calm and Quilt On!

Mary